
Digital audio from Macs
Many audio-orientated people prefer Mac for their music needs, but like Windows a bit of knowledge can help you draw the best sound from your Apple, says Stephen Dawson
In the last issue we looked at how to stop Windows from having its own quality-degrading way with your audio. This issue we move to Macs, which share many of the same limitations.
(I promise, next edition will not be about Linux… The ground over there is far too bumpy.)
ADVERTISEMENT
Homogenisation
Although some would prefer to deny it, underneath their chic interiors Macs are in fact general purpose computers. They have a particular advantage for quality audio over Windows in at least one major respect, but most of the time they simply have to deal with all the things expected of a computer, including ensuring that all the sounds produced by all the different applications can be heard smoothly and inoffensively, if not perfectly.
So, by default, a Mac – or more precisely OS X, which is running the show – will set a particular output format and convert all sounds produced by all applications to that format. Happily the conversion process renders the sound to the new format in good quality. But better yet you aren’t stuck with this. You can change the digital format to match your music so it is delivered with bit perfection to an external Digital to Analogue Converter (DAC), which of course is what’s best for the high resolution audio you have on your system.
This can be done manually, or by choosing the right music player it can even be done automatically.
Two up on Windows
Last issue we went through all the different ways in which Windows can feed audio to your DAC, with various drivers, WASAPI, Direct Sound and ASIO.
OS X is much, much simpler. Its system is called ‘Core Audio’, and you need no alternative to that, nor any workaround. For around five years Macs have provided built in support for the USB Audio 2.0 standard, unlike Windows. (Rumour has it that even the forthcoming Windows 10 still won’t support this.) USB Audio 2.0 supports 192kHz rather than just 96kHz. High quality DACs need to have special drivers installed on Windows machines to work properly. But just about all consumer DACs work to bit perfection with Macs, including with high resolution music up to 192kHz sampling and 24 bits, with no need for drivers. You plug the DAC into a Mac and within a few seconds the Mac will recognise it by whatever name has been programmed into the DAC.
The only trick then to bit perfect audio is make sure that the Mac is putting out the correct frequency, and that the volume control of your playback software is set to the maximum.
Changing OS X Settings
Changing audio settings on a Mac is not hard… if you know where to look. And there are two completely different places you must look. I’m using the Yosemite version of OS X here, but recent versions should differ little, if at all.
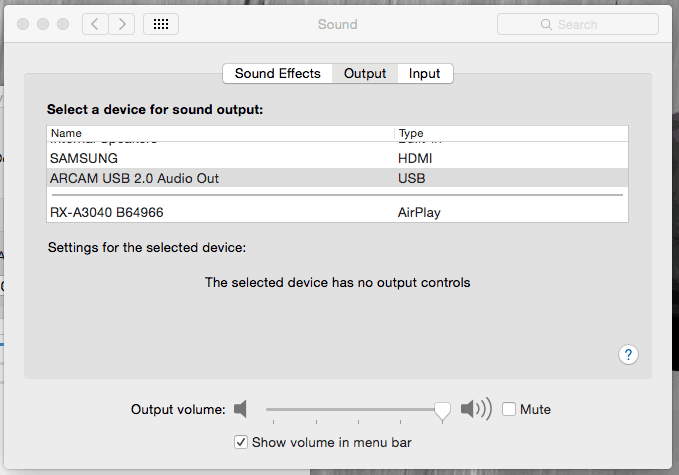
 The first place to look is obvious: System Preferences, accessible via your Toolbar. There you’ll find a ‘Sound’ icon. Click on this to get to the sound settings. It is here where you set which sound device you want your system to use. Rather usefully you can set a different output for sound effects, limiting the damage they might do to your music. Click on the ‘Sound Effects’ tab and click on the arrow next to ‘Play sound effects through:’ and choose an output, preferably other than your DAC. ‘Internal Speakers’ – the hardware speakers built into your Mac – is often a good choice.
Then click the ‘Output’ tab. This is where you set the default output for the main audio. There you will see your DAC, ‘Internal Speakers’, possibly the HDMI connection to your monitor if it supports sound and even any AirPlay speakers that are available. It’s here where you will select your DAC. Once done iTunes, music players within your Web browser and such will send all their sound to the DAC.
Unfortunately these particular settings are firmly lodged within System Preferences and can’t be readily made more accessible, such as by dragging the icon onto your desktop. Fortunately you should rarely need to get to this after you’ve set your DAC as the output device.
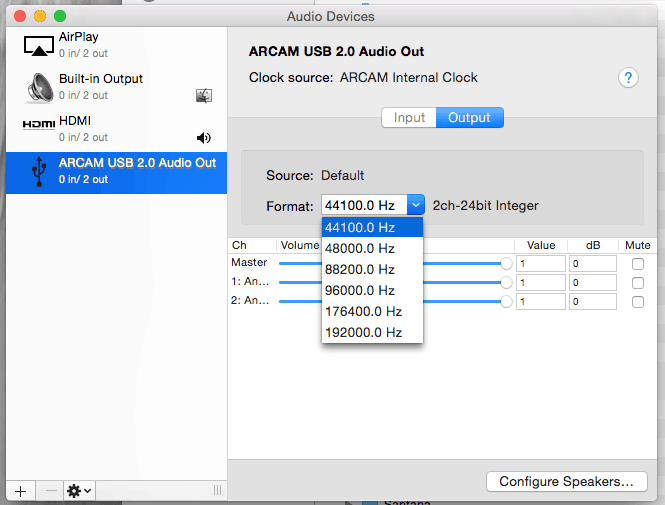
That is not the case with the other adjustment device provided by OS X. This is an app and can be hard to find. It’s called ‘Audio MIDI Setup’. You find it by starting the Launcher, and then choosing ‘Other’. This app’s icon is a small piano keyboard.
You are likely to want to interact with this from time to time. You can add it to the Dock once you’ve got it running (right click on the icon in the Dock, choose ‘Options’ and select ‘Keep in Dock’). My Dock’s a bit crowded so I keep a shortcut on my desktop. Open a Finder window, choose Applications. You’ll find the app in Utilities and can drag it from there to the desktop to create a shortcut.
 Start Audio MIDI Setup and you’ll see the same list of audio output devices as under the ‘Sound’ system preferences, but here you can do things with them. Specifically you can set the output format. Some devices allow you to change the sampling frequency, others also permit you to change the bit depth. Those that don’t will generally deliver the sound at 24 bits, even with a 16 bit input. Technically this isn’t bit perfect, but in practice it has no effect on the sound because 16 bits maps perfectly onto 24 bits with no loss of precision.
If your player can’t automatically change the output frequency, at least you can now do so easily.
Players
Most Mac users are perfectly happy to use iTunes as their music player. It has everything (which it is capable of playing, anyway) on the computer indexed and has a nice interface, and has the ability to feed the music to AirPlay speakers elsewhere on your home network. So what’s not to like about it?
 For me the main reason is that without an add-on it won’t support FLAC music. I have no doubt that Apple’s own lossless compression system, ALAC, is just as good. But the problem with ALAC is that very little non-Apple stuff supports it. I find it easier to use a FLAC-capable player on a Mac, than to reject most home theatre receivers and many media players because of their inability to play ALAC.
In addition you also need an add-on to have it automatically change the output frequency to match your music.
There are plenty of third party Mac music players, some of them which intertwine themselves with iTunes, some of them suited to the audiophile, and some of them costing hundreds of dollars. Seriously!
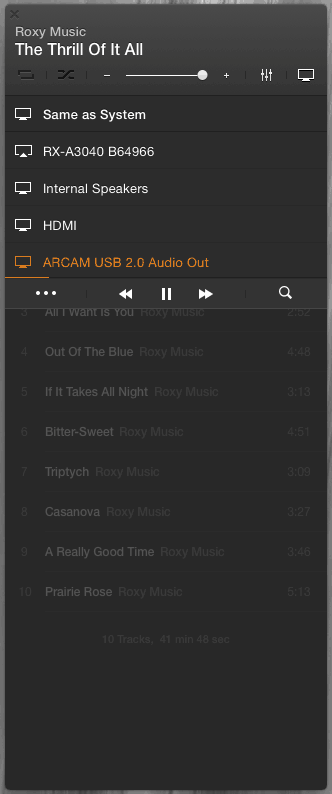
But some are free. I’m going to recommend that you start with one of them, specifically Vox (available in the App store). This supports just about any format you’re likely to have in your music collection, including high resolution FLAC. You can set it to automatically change OS X’s output sampling rate to match that of the track (Preferences, Audio). You can also set it to ‘Hog’ mode, in which it is supposed to take exclusive use of the audio device so nothing can interfere with the sound. This didn’t seem to be entirely effective.
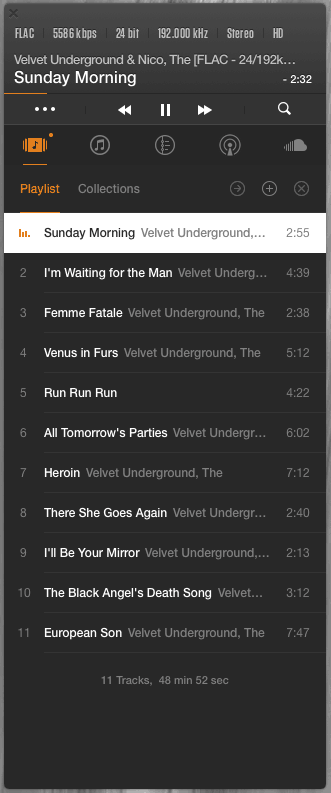 One nice feature: in an information bar across the top it shows technical data about the track that’s playing: Codec, bitrate, bit depth, sampling frequency and number of channels.
It has a direct hook into your iTunes database so it can readily play back any iTunes supported music. Otherwise if provides no effective indexing. I found it worked best just by keeping the music folder on my NAS open in a Finder window and dragging in the folder of whatever album I wanted to listen to.
Conclusion
I should add that there is plenty of software that offer audiophile features that seem dubious. Some, for example, can perform ‘memory playback’, which means rather than reading enough of the file from disk to keep the playback buffer filled, it loads the whole file into working memory before playing back. As I said, dubious.
So long as there aren’t interruptions to the flow of digital audio data, if you’re using an external DAC the most important thing is to deliver those digital bits to it without unnecessary conversions. Now you know how.
-
ADVERTISEMENT
-
ADVERTISEMENT
-
ADVERTISEMENT
-
ADVERTISEMENT